Thursday 30 April 2015

My " Flutterbies"

Even in my dreams I see Butterflies.....


For the first time in doodling I tried the reverse sketch technique with the help of stencil.....
Though I still wish that I could have given little more depth,so the butterflies stands out little more.....but still....Love the way it has turned out.
What say...
Now I am wondering how to proceed further....
Should I just frame it like this ??
Or
Use it as my cards background, and add colors with my 3D paper flowers...
Hmmmmm...

Anyway....
Let me first show you how I did this, then maybe you all can help me decide what to do more...
So here we go.....


Though I love cutting my own stencils,but this one is of "Blazer Designs" from

TheCraftersWorkshop.com  ( Internationally)
Try Crafterscorner.in  (India)
or Thecraftshop.in  ( India)

One of my absolute favorite stencil, curtsy of my good friend Nikki .... ;)


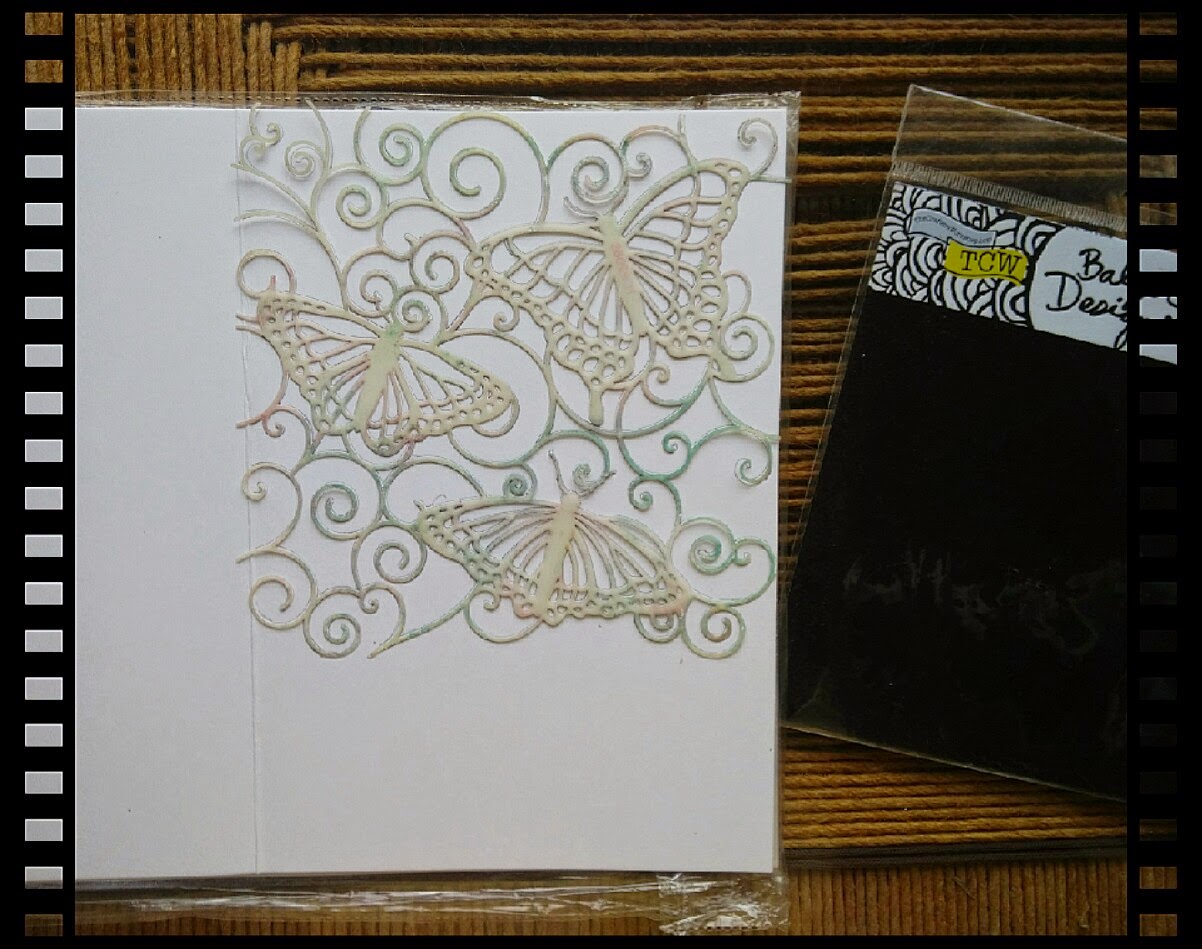
I placed the stencil on my card stock and simply traced the out lines with a very light pencil.


After tracing the stencil once I was left out with space at the bottom, so this time I placed the stencil little tilted and traced again, and again....and covered the whole of A5 size paper..... 
(I had sharpened the image and increased the contrast so that it is shown very clearly here.)


This is my ready A5 size card stock, with beautiful butterflies traced on it.....


Now I'm ready to start my doodling.....
I have used 0.2 and 0.5 Rotring Isographs pen for this doodling, my absolute favorite....


And as I wanted to do the reverse sketching, I started with filling out the negative space in the butterflies, rather then the positive....
Once the butterflies were done, it was time for the background....
And there instead of just filling the background , I made my life complicated ;)
I added flowers as filler to give a look of another layer....


And Viola !!!!!!
My "flutterbies are ready to fly off.....
Especially for Cheryl B. Lemine.....

Hope you all like my work....
Please do leave me your valuable suggestions, especially about what to do....
I really do appreciate them...
Thanks....n stay tune to what I do with them further in my next post....

Tuesday 31 March 2015

3rd BIRTHDAY Shaker Card

For my darling nephew....

...inspired by challenge at Lulupu


The Idea for a 3rd birthday card,especially for my little cutie-pie nephew has been bouncing in my head for quite some time....but what with my kids exams and all, this month just flew by.....and before I knew it ,it's already end of the month. 
Seeing Lulupu's this months challenge, galvanized me to do it......so here it is....

In this card I have incorporated lot's of small small techniques which has appealed to me in last couple of months.

1. Making clouds for your background


  Since I saw this technique on "Pinterest", I have been wanting to Incorporate this in one of my projects.....And I guess I went over-board....lol....instead of just cutting a simple paper cloud I ended up making my own stencil with 210 gsm OHP sheet. And added not only clouds but Sun too....    


For making my stencil ,I roughly drew some clouds and sun on a piece of paper, and then traced it on OHP sheet. Cut the whole thing with my trusty paper cutting knife , and I was good to go......


After roughly placing my balloons , got the idea where all I needed to add clouds so the background doesn't looks blank.....Used Tumbled glass distress ink pads and my stencil to achieve this....


2. Making shaker box


I have this beautiful " Martha Stewart's HAPPY BIRTHDAY Punch....It was ideal for making my Birthday shaker box....


After punching I left little extra paper on all three sides and added a thin strip on top as well as I wanted to make a box and give it a look of "Treasure chest".


With thin red strong double sided tape I added little ohp sheet....
Then I added thick foam tape so it makes a bracket for my sequins.....
And my Birthday tag was ready to be fixed on my card along with colorful glittery sequins....


Lastly drew belt straps,buckle and stitching lines all around to give it a look of "Treasure chest".  Filled with all the happy colors..... 


3. Balloons from scraps of gift wrapper


Yes ! that's right I had strip of gift paper left,after packing a gift for my little one's friend. The balloons were so colorful and shiney that I didn't wanted to threw that.


So I'm finally making a good use of that...lol...
I decoupage the balloons on thick card paper, once they were dry ,I cut just three of them out,as its all about 3rd birthday day.


One thing though, Mod-podge has kinda dulled the shine of the balloons....and I can't make up my mind whether I liked that effect or not.


I guess I like it ....as it is making my sequins shines that much more....

lastly assembled everything together.... and my card was ready.....


Hope you all like my work.....
Please do leave me your valuable suggestions....
I really do appreciate them......
Thanks.....

P.S. ---- so very much wanted to enter it for lulupu blog challenge....
added the link and in between the linkup closed....missed it by couple of minutes....sob! sob!....


Wednesday 18 February 2015

"Happy Anniversary" Mix Media Card

"It's all about LOVE"

Well I'm one of those lucky few who's anniversary coincides with Valentine week's celebrations.
Not the date though ( well we really tried hard to get married on the valentine day, but couldn't make it....too many weddings on the same date, so no Pandit ji or even venue was available.) but still it's the time for me to play around with lots of glitter,glam, roses and heart.....lol


It's another of mine mix-media card, tried for little " shabby chic concept" but couldn't bring my self to go all the way. Didn't had the heart or you can say confidence enough to distress all the things and make them look shabby, that I had worked really hard to make.
Maybe I can make the same card again ,and this time do the distressing,....well if I do that, then I'll definitely link that to this post....lets see...

So I started my card by distressing the base which is " Script Cream from Recollections", I used walnut stain distress ink for distressing all the four sides. Further on I blotched  it with Teal water color, just dropped it from a distance with a aqua brush, to give the look of ink-stains. Was little apprehensive of doing this,"what if I spoiled the whole thing?" as it was the last bit of script cream scrapbook paper that I had. All went well though, and I really loved the splattered look of the teal.
Added a dainty darling satin lace vertically on left side of my card.


Then comes the "Heart"....I took a felt dollie, cut it into heart shape, painted it with two layers of gesso because it was in grey color and I wanted it in off-white, so after gesso dried I stained it with tea dye distress ink and applied 3D glitter. That done I layered it on previously stained corrugated heart. Adorned it with pearl and natural hemp cord rings.(also known as jute cord or twine) You can find them at kraft outlet


N now its time for my "Roses and Butterflies"......
On watercolor paper I had painted 4 small to big flower petals for small rose and 5 small to big flower petals for big rose .....and same for the leaves....with transparent watercolors....


Cut them separately, shaped them and stuck them together to to make a nice rose and did the same with the leaves too.....


For butterflies I went experimenting and fooling around with my distress ink pads.....
just applied the pads directly on watercolor paper, sprinkled it with water,so the colors started merging into each other. Once dried punched it with " Martha Stewart's Monarch butterfly" punch and my butterflies were ready to fly off, so I took 2 butterflies of the similar color and tied them together with jute twine, shaped them a bit, and they too were ready to adorn my card......


So put them all together on my card......
My roses in one corner along with some white pollen and my contrasting color butterflies on the opposite direction.... once I was happy with the composition, just glued them all. 
And finished my card by adding "Happy Anniversary" mdf sentiment tag.....

That's it.... My "one of it's own kind" card is ready 
                          Especially for my Hubby......lol

Challenges entered:

Fussy and Fancy Challenge 132 - It's All About LOVE!


All sorts Challenge Week 298 - Any occasion than Birthday

 Fusion card challenge

Entered in Fusion card challenge as well, as I just realized that colors of this card does matches with the theme there as well....

Hope you all like my work.....I know it's a very long post, so please forgive me for it.
But please do leave me your valuable suggestions....
I really do appreciate them......
Thanks.....


Birthday Card

Card with Aqua,Orange and Brown 

I always loved handmade cards, and recently I have gotten into mix-media cards...
Though i don't know how accurate it is to call this one mix-media card in proper term, but i just loved the different different elements put together to achieve a complete look.....


It's Fusion card challenge time again....
I used both for this card.... inspiration color picture as well as sketch.


I know I have added too many elements....lol
I have used bronze printed vellum paper, distressed with  walnut stain on all 4 sides as my base.
Then comes satin lace, on which I applied gesso for the matt look and pasted it on dark brown corrugated paper strip.
Then I used my favorite "Vintage Resin Lady Cameo" that also in holographic teal color, that's why it has a rainbow shine. Traditionally a woman's profile carved out of white shell against a coral background is the real Cameo,used all over the world in jewelry. But for crafting, now u get various options.....and I just so love them. 
Anyway.... I layered my teal Cameo lady on mdf frame and then on teal felt dollie, and on it goes on my card along with the mdf sentiment.


I colored my die cut flowers with squeezed lemonade, spiced marmalade and worn lipstick distress stain, added sequence glitter to to make the center.  Leaves with tumbled glass, peacock feathers and mowed lawn distress stain. Flourishes with squeezed lemonade and mowed lawn distress stain. And on white flourish added pearls after applying gesso. Made small butterflies with "Martha Stewart's monarch butterfly" punch, colored them with spiced marmalade and picked raspberry distress stain. Stuck two layers together for the winged look and added sequence glitter at the center.
Assembled them together to make a nice bunch, in accordance to the sketch.

And my card is ready for the submission !!!!

Hope you all like my new venture in mix-media card making.....please do leave me your valuable suggestions, which can help me do better.....I really do appreciate them.


Saturday 10 January 2015

Funky Oriental COASTERS

Colorful coasters for all the tea time 

I have been meaning to upload lot of my arty-crafty projects for long time....
but what with two kids running around and creating havoc and me being part of it, 
you can guess how it goes....so I do get morning hours to work on my passion of crafts,
but not enough time to think and write about them and up load.....

Well today seems to be one of my lucky days when everything is going by the clock 
and I still do have little time to write one more blog post, partially because in this 
project I don't have to think too much about what to write as I had already written it once,
so just gonna explain it properly, and all set.....    
so let's see......

Materials Required

1. 3" x 3" MDF/wood squares, 6 pieces.
2. Sand paper(also known as flint paper) or file.
2. Gesso or white acrylic color, matt finish.
3. Solvent based stained glass colors and black liner.
4. Tracing paper and pencil ( 2B would be good).
5. Clear varnish spray.
6. Felt or Foam for backing.
7. Fevicol or any strong adhesive.

Procedure


Step 1. Take your MDF or wooden squares, wipe them clean with tissue,
            smoothen the edges if they are rough or uneven, with sand paper.


Step 2. Apply 2 coats of "Gesso" or white acrylic color. Keeping the interval
            of 15-20 minutes in-between the coats.
           That will give each coat sufficient enough drying time.

           I had posted the same project in another DIY craft site, and the most asked
           question was " WHY APPLY WHITE GESSO OR ACRYLIC AS BASE?"

          Answer is very simple....if you apply your stained glass colors directly on MDF 
          or wooden base, your colors will look in-descriptive.....WHY ? 
          Because A) Stained glass colors are transparent colors,so the brown mdf shining
                             under red color will make it look dark brown....
                             similarly yellow will turn mustard, green into dirty green...and so on...
                        B) Mdf or wood are porous materials, so they will absorb more colors.
          Where as White GESSO which is basically a primer 
          or White Acrylic as base will help reflect colors.
          And your coasters will look more bright and fresh.


Step 3. By the time your Gesso base is drying, it's time for selecting a design,
             and drawing it on tracing paper.....
             You can make your own designs or pick one from any design book.
             Make sure you draw on both the sides of tracing paper.
             Now fix your tracing on your coasters, with the help of any adhesive tape.
             Re-draw your design on tracing, the other side of the design on tracing 
             will get transferred on your coaster, as you had drawn on that side earlier.
            

Step 4. Out-line your traced design with stained glass out-liner.
             Let it dry for 3-4 hours.


Step 5. Fill in your desired stained glass colors (solvent based) in your design.
            Apply 2-3 coats for vibrancy and thickness of colors.


Step 6. Spray 2-3 coats of clear varnish. Keeping the interval
            of 15-20 minutes in-between the coats.
            That will give each coat sufficient enough drying time.

   
    I forgot to mention it earlier,that's why added it later on.
    These pictures are of the varnish spray can, choose any brand which is easily available,
    the only constraint is it has to be a clear varnish, meant for sealing craft projects.


Step 7. Cut felt or foam same as the size of your mdf/wooden coasters.
             Stick it at the back of your coasters with glue or any strong adhesive.


All the steps in this picture, from blank MDF 3"x 3" square to colored along with
the backing of felt.......


And Ta Da !!!!!! Your beautiful coasters are ready to be used......

Hope you all enjoyed reading about them as much as I loved creating them.
And they have inspired you enough to give it a try,if any problem do get back to me, 
I'll try helping as much as I can....

Do leave me your valuable suggestions....
I really to appreciate them...
Thanks a lot for visiting my blog......